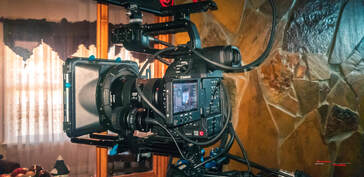
 Our C100 MkII on our 15mm rail rig. Our C100 MkII on our 15mm rail rig.
The 15mm rail camera rigs are sometimes described as "Barbie for filmmakers." A rig allows you to add a wide range of equipment to enhance your camera's functionality and make it easier to capture amazing shots.
It provides a more stable platform for filming than can be achieved just by holding the camera directly in your hands, but it still allows some motion which is great for making more intense, dramatic action shots. It gives you a handheld look without excessive jittering and shaking that would distract the audience. When you want to be completely stable, a rig can easily be mounted to a tripod or other support. We have been using a camera rig for years in many of our productions, and even though we now have motorized gimbals and steadicam systems, we still find our shoulder mounted camera rig very useful in many situations, such as shooting exciting action shots. It also provides a great deal of extra versatility that other supports can't. A rig is, in our opinion, the best support platform to start out with using, and one you will continue to find use for throughout your production career. We won't cover every accessory you can mount on a rig, but lets look at some key elements of a camera rig that you should remember as you build your own! Assembling Your Camera Rig
You have to decide on a body for your rig first so that you'll have a foundation to build the rest of it on. There are a number of different platforms you can start with. Some rigs come with shoulder mounts and hand grips for enhanced stability while moving.
If you like to keep your equipment lightweight and compact, you may prefer a simpler design. A camera cage with a handle is a great starting point for a lightweight setup. Keep in mind, if you are using a cinema camera and want to get a cage with your rig, you will need to get a cage big enough to fit it. Here are a few examples of rig bodies you can start with:
Notice the 15mm rail systems which each rig includes. You need to be sure that the body of your rig has these rails, or at least mounts for them. The 15mm rail system is a feature that separates rigs from regular grips. The 15mm rail allows you to mount accessories, shoulder supports, and other equipment to the rig.
You can also build a totally custom rig from scratch if you prefer. Start by getting the various lengths of 15mm rails that you need. At a minimum, you'll need to get a camera mounting base to go on the rails so that your camera can be attached to it. If you want, you can also add a shoulder mount and/or hand grips of your choice, along with any other accessories you desire. Selecting the Attachments
Follow Focus
A follow-focus is a highly recommended addition to any rig. It allows you to easily pull focus while maintaining a smooth, steady shot. Even if you prefer to keep everything lightweight, a follow-focus will be well worth the extra space it requires. You can get minimalist follow-focus handles, which strap directly to your lens, but we recommend a rail mounted geared follow-focus, or even a motorized follow focus.
The most common follow-focuses are manually operated. There are some motorized ones, but they are usually very expensive and may take some extra practice to learn to operate effectively. We use a manual follow-focus and a motorized follow focus depending on the situation and what type of shot we are going for. A follow-focus is one of the best improvements you can add to your camera. It will enable you to pull focus on subjects smoothly and quickly, and it will open the door to using creative focus techniques in your filming. Many lenses built specifically for video/film, like cinema lenses, are manual focus only. With these lenses, a follow-focus is usually a must since trying to pull focus with just your hand will create a shaky shot. Here are some follow-focuses that you might be interested in.
Matte Box
Matte Boxes help cut down on glare and undesired lens flare caused by light sources. Some matte boxes also allow filters to be mounted on them directly rather than on the camera lens itself.
A matte box isn't the most critical piece of equipment in most situations, but it's great to have one, especially when filming around bright light sources. Higher-quality matte boxes usually are more effective at reducing glare and include professional features such as "doughnuts" which help reduce light-leaks where the lens meets the matte box.
The FOTGA matte box above is an advanced piece of equipment when it comes to matte boxes. We use a FOTGA matte box on our camera rig and it performs great! This is a great choice for professional filmmakers, but if you are just starting out and a beginner with film/video, it may honestly be a bit overkill for your first matte box. It's not hard to use, but it includes some more advanced features you probably don't need yet, such as the 4x4 filter trays.
If you're looking for something more basic just to keep glare off your lens, the Neewer matte box below might be a better selection to suit your needs. It's also a more lightweight option.
Monitor Screen
Have you ever thought a shot looked perfect on your camera's screen only to re-watch it on your computer and spot something you couldn't see with your camera's display? The built-in display screens on cameras are too small to give you a good look at your shot. It's easy to miss small details that can make a big difference. This is especially true for shots where you are having to pull focus on different subjects.
Adding an external monitor to your setup will save you lots of headaches and eye strain. It will let you get a more detailed view of your shot so you can catch the little things you might otherwise miss. You can easily attach the monitor to a rig using a 15mm rail mount and swivel arm. The swivel is very important because it allows you to adjust the monitor so that you can see it in any position. Many monitors come with what you need to attach it to your rig. Here is a good starting choice for an external monitor screen.
This was the first external monitor we purchased to use with our camera rig. It is still used with some of our cameras to this day. The Feelworld FW-760 also provides additional functions that some cameras may not have on their own, such as focus assist (also called "peaking"), false color, anamorphic modes, and more!
This particular kit comes with pretty much everything you need to get started (except just the 15mm rail adapter to mount it on your rig), including several mounting options, including a magic arm and swivel head shoe mount. All-in-all, this is a great monitor to use with your camera rig. Click the link above to check it out for yourself! Remember, you'll also need a 15mm rail shoe mount to put it on your rig. There are more advanced monitors out there as well. You can also get wireless monitors if you prefer not to deal with cables. Wireless monitors are rather expensive, so it also depends on your budget. Pre-Built Rig Kits
If you aren't worried about customizing each part of your rig, you can get pre-built rigs which come with many of the essential components included. This might be a good choice if you just want to get a rig to mess around with as a starting point. You can always customize it more and upgrade parts of it later on as you go.
Here's a good, affordable option to start with.
There are many accessories you can get to customize your camera rig, these are just the main essentials to get you started. The great thing about a rig is you can upgrade parts of it as time goes on and add/remove accessories based on the specific needs of each production you shoot with it.
We hope that this helps you in building your 15mm rail rig for your camera, and we will continue to update this article as time goes on. Loading...  RSS Feed RSS Feed
0 Comments
Leave a Reply. |


Quick Browsing |
ShadowCast Offers |
ShadowCast ResourcesVertical Divider
|
ShadowCast ShowcaseVertical Divider
|


Accepted Payment Methods

All major credit cards and PayPal
© 2024 ShadowCast Productions and Talent Studios. All Rights Reserved except where otherwise stated.